I have a friend in southwest Connecticut who is on the more unfortunate side of the eviction process. After a decade of renting a home his business has hit a rocky spot and he can’t pay his rent. Naturally, his landlord has initiated the “Summary Process,” which is what they call the eviction process in CT.
I have been on the other side of this equation, i.e. the person executing the eviction, so he called me to ask what to expect. Since I was sharing my insight with him, I decided to pen this piece to share with anyone who may be experiencing this.
The primary question every one has is: How much time do I have before I’m homeless?
The answer is: It depends.
If the landlord brings his best game, and you counter with your best, but fortune goes his way (responsive/non-lazy constable/marshal, no holidays, lucky court schedule) you could be on the street within 6 weeks of not paying your rent. More realistically, you will probably have 8 weeks in the residence after your failure to pay the rent (for example: Didn’t pay rent due on 1 January—you will likely be homeless by March).
The reason for the variability:
- Every step runs on a timeline with minimum waiting periods. Holidays and Sundays do not count in some instances, so they may extend the time.
- The enthusiasm and diligence of your landlord and/or his attorney can make a significant difference. How quickly do they transition from one step to the next? You will understand better as I explain the process.
- The broken CT State Marshal system will be a bane of the landlord.
- Luck-of-the-draw. The court will assign certain dates, such as a return date or trial date. These wait periods are not strictly defined. In some cases it may be 7 days. Other times it may be 12 days. You never know.
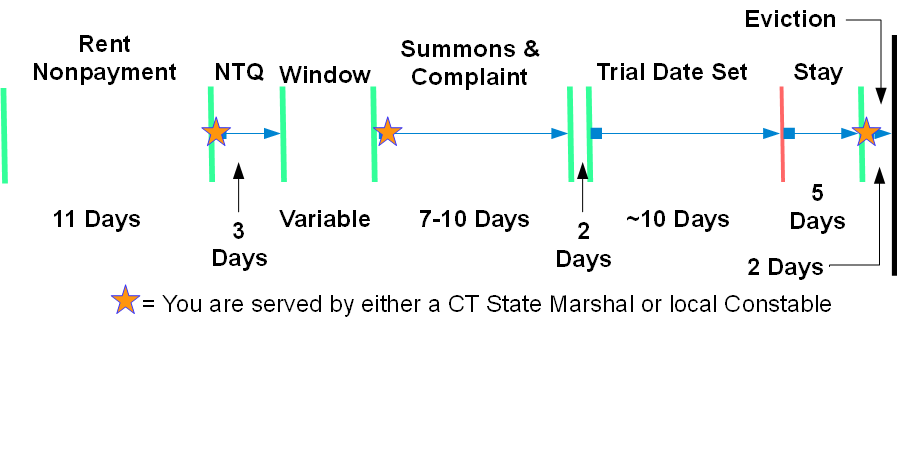
The Summary Process – Step 1 – Notice to Quit (NQT)
It usually starts when you have been chronically late in paying your rent. Eventually your landlord loses confidence and makes the decision to terminate the business relationship. To get the ball rolling in CT the landlord must wait until you are 10 days past-due in paying your rent. So if your rent is due on the 1st of the month, and he doesn’t have it by the 10th of the month, here is what you can expect on the 11th of the month: Notice to Quit (NQT).
The NQT must be formally served to you by a CT state marshal or a local constable. It will be either the official CT form (JD-HM-7: Notice to Quit Possession), or it may be simply typed out on a sheet of paper with the required information. The required information includes:
- A demand that you leave
- A date by which you must vacate the property
- A reason you are being told to leave
- An explanation that if you do not leave, then an eviction process may commence
- A copy for every adult living in the premises
Additionally, wise landlords will include a statement like this:
“Any and all funds received will be applied to Use and Occupancy.”
Here is what this means in plain English: You are being evicted, and nothing is changing that. This decision has been in the works for a long time, and now that I have made it, there is no turning back. You can go ahead and give me money, but that is not going to stop this train from rolling down the tracks to its destination. The money you give me will not be considered late rent; it will be used to compensate me, the landlord, while you occupy my property during this process.
Don’t be surprised if your landlord tries to convince you to pay him something (anything) while this progresses. It’s your choice to make, but just understand that your payment is going to change nothing. He can promise you on the phone that your paying will make him change his mind, and you will get to stay, but that’s not true. You are getting evicted.
Regarding the reason you are being told to leave, they must be legal. The two, most common reasons are:
- Nonpayment of rent
- Lapse of time
If you started out with a year-long lease that transitioned into a month-to-month after a few years, you should see both reasons. Lapse of Time will be included, because they don’t want you to have the opportunity, in court, to pay arrearages and extend your stay.
The process server will either deliver the NQT to you in person, or attach it to residence’s primary entrance. That is considered a proper service. The clock has now started ticking. Actually – the clock started ticking 11 days ago when your rent was due.
This is the first instance in which a lazy landlord will work to your benefit. The soonest he can serve you is on day 11, but I know of instances where a landlord or their lawyer are not Johnny-On-The-Spot, and the NQT is not served for many days or weeks after the statutorily mandated waiting period. Their loss = your gain. They don’t get those days back.
Also, the NQT must give you 3 full days to get out. So if you are served an NQT on Monday, 1 July, you must be leave by Friday, 5 July. The 3, full days are: Tuesday, Wednesday, and Thursday.
Realize that the court is not even involved at this point. They have no knowledge of what is happening. When the date arrives that you were told to quit (leave), and you haven’t left, then the landlord will get the court involved.
Step 2 – Summons and Complaint
So were told to leave by a certain date, and you didn’t. Now the landlord will get the court involved, and his expenses and required effort will grow from here. He will complete two forms: (1) Summons, and (2) Complaint.
After he completes these forms, he will have to go the court house, in person, for the Housing Session. There he will present the clerk with the Summons, Complaint, the NQT, and the proof of service of the NQT. The clerk of the court enter a “return date” on the Summons. (Extremely Important) After that visit to the courthouse, he will need to get the marshal or constable to serve you – again.
On the timeline, I call this a “window.” A diligent and motivated landlord can have this done by lunchtime. I always had this wrapped up very quickly. The only issue is finding a CT State Marshal who is not on a week-long doughnut break. Yes, the CT State Marshal system is broken. I can’t imagine how a state-mandated monopoly is so unresponsive, but it is. Smart landlords use local constables, if they can find one who isn’t a hedge fund manager wanting to pretend he’s a gunslinger.
After you’re served, it’s still not over for the landlord. He then needs to return to the Housing Court location, and file all the paperwork he served you, plus the second proof of service, and write the state a check for $175 bucks. That’s no concern to you. I only mention it because it’s worth understanding that the eviction process is a real pain for the landlord, something he does not want to do, but you’ve left him no choice.
But here is your concern. You just received two items: a summons and a complaint. The summons has a return date on it. No later then 2 days after the return date you must file with the court a response to each, which is an appearance and an answer.
The summons is telling you to come to court. Your appearance form is stating that you will, indeed, be in court.
The complaint is explaining the reason for the eviction. Your answer form is a response to the allegations of the landlord. For example, did you really not pay your rent?
If you don’t get the appearance filed with the court no later then 2 days after the return date, you’re done. Your landlord will file for a default judgment for failure to appear. The court will award the judgment, because you essentially failed to show-up when summoned. So get that appearance form in, but do it on the last day possible.
Typically the delinquent renter will file the appearance and answer at the same time. But the real pros will engage in the risky, semi-nefarious tactic that I describe in the next paragraph.
You must get that appearance form in on time, but you can play a little game with the answer form. Don’t file the answer on time. This landlord will then be forced to file a Motion for Default Judgment for Failure to Plead, and he will snail-mail it to you. Essentially, you did figuratively “show up” when summoned (you filed an appearance), but you failed to respond to the accusations against you. Remaining silent is not optional unless you want to be kicked-out ASAP. Once he files that motion for default for failure to plead, you have 3 days to get your answer in. You just bought yourself 3 extra days.
Keep in mind, the US Postal Service may take 2-3 days to get this motion to you. A smart landlord will put that Motion in a blue mailbox the same day, but around 9 PM. It will be a mailbox in a different town. He will also make sure that blue mailbox has only one pick-up of the day, and it’s late in the afternoon. Basically, by the time you receive this Motion, the opportunity to respond is gone. That is not a legitimate excuse for you. Have the fax machine warmed-up and ready to go. Check online and call the clerk’s office to see if this motion has been filed. Don’t wait to receive it via the mail, because it will be too late.
Here’s an important point… Up to now, your landlord has been hustling all over the place to push this process forward, including paying process servers multiple times, paying the court, and several visits to the court. You printed out two forms, and faxed them into the clerk’s office. That is correct. You (not the landlord) don’t even have to drive to the Housing Session Courthouse. Just fax them in at the last possible hour, and give a ring to the clerk to confirm that were received. That’s the only thing you have done thus far: fill out two forms and faxed them the courthouse (10 minutes total).
I don’t know if it is fair or not, but the burden of time, effort and money is clearly placed on the shoulders of the landlord. So if you’re getting mad at your landlord for not giving you free housing, remember that he’s not having any fun either.
Step 3 – Wait for your day in court
You’ve gotten both your appearance and your answer in on time (perhaps the extended time for the answer). Both parties are now ready for their day in court, which will be about 7-10 days out.
If you haven’t paid, you’re probably going to lose. It’s almost always that simple. Their may be other factors, but I’m not going to address them here. Those factors are nuanced, and deserve a more extensive discussion.
Since you are going to lose, you don’t even need to go to court. You will lose be default. You landlord (or his attorney) does need to be there, and they better be there. Once you lose, there will be a judgment against you, and you have 5 full days to get out.
The only reason you would go to court is to try to work out some sort of stipulation (agreement) with your landlord.
If you show up to court, wait in the courtroom, and when your name is called stand up and say “ready.” The judge will instruct you and the landlord (or his attorney) to meet with a mediator. If you’re able to work out an agreement/stipulation with the landlord, the agreement will be presented to the judge, who will make the agreement a legally enforceable Court Order.
What would be a reasonable stipulation to which your landlord would agree?
Perhaps you stipulate:
- You will be able to remain in the residence for an additional two weeks
- You will permanently vacate on XYZ date
- Any and all property left behind will be considered abandoned
Why would your landlord agree to giving you an additional two weeks? That’s costing him big money! Here is why… In CT, any property you leave behind from an eviction is not abandoned. It is your property. The landlord is required, by law, to pay his money to have a marshal hire a bonded and insured moving company to professionally pack all of your stuff and ship it to a government leased storage facility. (The nightmare never seems to end for the landlord). Maybe the landlord would rather give you two weeks (costing perhaps $1,200 of lost revenue) instead of paying $3,000 (direct cash debit to his balance sheet) to carefully pack and transport your stuff.
Step 4 – Judgment
So you lost your case, either because you didn’t show up to court (default) or you showed up and were not able to convince a judge. Either way, you have a judgment against you, telling you to leave in 5 days, not counting Sundays, Holidays, and the court day. This is getting serious at this point. If you don’t have a “Plan B” for a place to live, you better figure one out post haste; you will be homeless very soon. Technically, what happens is the Court orders immediate possession to the landlord, with a 5-day stay of execution. So it is “immediate,” if “immediate” means 5 days from now (Franz Kafka, anyone?)
Step 5 – Summary Process Execution (i.e. Eviction)
5 days will pass, and you’re still in the residence. Not good. The landlord will go back to court, in person, yet again, and to get a Summary Process Execution. The landlord will then search for a working marshal, and get this served to you (yet again). At that point, you have 24 hours to leave. No joke—it’s real. No sooner than 24 hours later, the marshal/constable will return, with friends. He will have your favorite boys-in-blue with him. They will walk right into the residence, with a key or by force, and take you by the arm. They might let you grab your toothbrush on the way out. You will be physically escorted to the street and warned that if you step foot back on the property you will be arrested for trespassing. If you push things this far, you have been officially “evicted.”
As mentioned, all of your property will be professionally packed and moved to a town/city-leased storage facility. You have the opportunity to pay the town for storage and claim your property within a limited period of time. If you don’t claim your property, you’ll see it being auctioned on one of those reality TV shows.
Suggestions for Renters
This article was written with a view largely sympathetic to a delinquent renter. If you can’t pay your rent, you’re obviously in a serious rut. The Summary Process will lead to your eventual eviction, but it also provides you with time to help get your business in-order and execute a Plan B.
I suggest you not hold any ill-will towards your landlord. It’s just business. That residence is an asset of his, and he needs it to achieve his financial goals. He did not want to evict you. The process cost him 2-months of rent. It cost him multiple trips to courthouse. Multiple fun engagements with CT State Marshals. Hundreds of dollars in court fees and marshal fees. Now he has to repaint and clean the entire place, before he can even start looking for a new renter.
I strongly suggest you not do anything malicious to the property, e.g. revenge tactics like Quikrete down the drains. Not only is that ethically corrupt, it is illegal. Depending how bad the revenge is, you could be facing civil and criminal charges.
Suggestions for Landlords
As I mentioned, I’ve been on the landlord side of this equation. This has to be viewed as a violation of a contract, and nothing more. It’s not personal, although it may create a temporary hardship of decreased cash-flow.
Don’t harass the person you are kicking out. That’s a good way to get your residence “accidentally” damaged. Just leave them alone. The only time you will have to talk with them is (maybe) on the court date. If you hire a lawyer – never.
Good landlords plan to get paid rent 11 out of 12 months, because there is downtime during turnover. If you find a good tenant that stays several years, you should be storing that bonus month every year; planning for an eventual turn-over or summary process.
If you have to eventually kick-out a tenant that paid rent for 10+ years, then you are both on the losing end. That renter bought that house for you, and you didn’t even have to paint the interiors annually. Even though it ended on a down-note, you owe them a tremendous debt of gratitude.
Should you hire a lawyer? The summary process is EASY. A lawyer will free-up your time, but realize that a lawyer will move very-slowly compared to what you want. Motions will not be filed immediately, nor will papers be served immediately, but will happen according to their convenience. If your rent is $2,400/month, each day burned by a slow lawyer is another $80 lost. Expect a lawyer to waste about 10 days via delays.
Disclaimer
Chris Sandys is a resident of Greenwich, CT, but I am not a lawyer, so this is not legal advice. It’s a practical narrative of how the legal system works from a layman’s vantage.
The Summary Process is easy. It’s not rocket science. Whether you are a landlord or a tenant, you can handle this on your own. This was a general overview. Different waiting periods apply depending on the reason for a NTQ and the underlying contract.
Just arm yourself with the knowledge available here: CT Law about Landlord/Tenant Law.
As a starter, I recommend you check out:
(1) A Landlord’s Guide to the Summary Process
(2) A Tenant’s Guide to the Summary Process
Read both. It is the same information, presented from two opposing viewpoints.